Showing posts with label sewing. Show all posts

Tuesday, September 7, 2010

SEWING 101: BABY /TODDLER COSTUMES

This is why I love crafting.  Holidays!.  Halloween is a perfect holiday to pull out the stops and endulge your crafty side.  Learn basic sewing and make a fun and unforgettable costume for your little monsters!  Details about the class. 

photo credit:  Martha Online

Monday, August 30, 2010

A Tutorial and Maybe a New Class

Gosh, I could make one of these for me too. How about a class?  The Tutorial is here but keep an eye out for  a class from Stitch DC. You'll learn basic sewing, inserting azipper and finishing.


Thursday, July 29, 2010

Mystery Quilt Along POST #3

Stomach flu with the kids prevented me from posted on Friday so Wednesday is the new Friday.  Gotta figure out what the new wednesday is.  I grew up on Long Island and according to Carvel.  "Wednesday is Sunday so maybe another post on Sunday." 
This long post is for Knitters Today.  Crocheters and Quilters I'll have a big post for you on Friday so get as many square ready as possible. 

Knitters...  How are the squares coming along.  I have two strips that we can now knit.  This is entrelac so you need to follow each row.  It does work but it's magic as it does.  Trust me...

MAKE 2  (each will measure 3inches  by 37.5 inches long)

NOTE: Work base triangles, followed by left side triangle, tier one, right side triangle and tier two. Work tiers one and two until desired length; end with one more tier one section, followed by the final tier triangles.

Base Triangles:
CO 10.
*Row 1: (RS) k1, turn
Row 2: and all WS rows: purl all sts in that section
Row 3: sl 1, k1, turn
Row 5: sl 1, k2, turn
Row 7: sl 1, k3, turn
Row 9: sl 1, k4, Do not turn.*
Repeat from * to * to end of row, turn.

Left side triangle
Row 1: (WS) k1, turn
Row 2: kfb, turn
Row 3: k1, p2tog, turn
Row 4: k1, m1, k1, turn
Row 5: k1, p1, p2tog, turn
Row 6 and all RS rows: knit to last st, m1, k1
Row 7: k1 p2, p2tog, turn
Row 9: k1, p3, p2tog, do not turn, work tier one:

Tier one
Row 1: (WS), With wrong side facing, pick up and
purl 5 sts along selvedge edge of next triangle. Sl last st
picked up onto left needle and p2tog, turn.
Row 2: k5 , turn
Row 3: sl 1, P3, p2tog, turn
repeat last two rows 4 times (5 stitches).


Right side triangle

Row 1: (WS) Pick up and purl 5 sts along selvedge of next triangle or square, turn
Row 2 and all RS rows: knit to end of sts in this section, turn.
Row 3: sl 1, p to last two stitches, k2tog, turn
Repeat last two rows until only 2 sts remain.
On next odd row: k2tog
The remaining stitch will be counted as the first stitch picked up for the first square in the next tier.
Turn and transfer this stitch to the right needle.

Tier two
Row 1: (RS) With right side facing, pick up and knit 5 sts along selvedge of next square or triangle. For the first square only, the remaining stitch from the last tier counts as 1 picked up stitch. Sl last stitch picked up to left needle and ssk, turn.
Row 2: p5, turn
Row 3: sl 1, k3, ssk, turn
Repeat the last 2 rows until all 5 sts remain.
Do not turn.
Repeat another tier two triangle.

Then continue by working [Left triangle, tier one, right side triangle and tier two] until 37 inches then go to Final Tier Triangles.

Final Tier Triangles
Row 1: (RS) With RS facing, pick up and knit 5sts along selvedge of next square or triangle. For the first triangle only, the st remaining counts as the first picked up st. Sl last st picked up to left needle and ssk, turn.
Row 2 and all WS rows: purl to the end of sts in the section. Turn.
Row 3: k2tog, k3, ssk, turn
Row 5: k2tog, k2, ssk, turn
Row 7: k2tog, k1, ssk, turn
Row 8: k2tog, ssk, turn
Row 9: sl 1, ssk, psso, do not turn. The rem st will count as first st picked up for next triangles. When all triangles have been worked, fasten off last st.

Block


Abbreviations:

K: Knit

Kf&b: Knit the next stitch and leave on left hand needle; knit the stitch again thru the back loop.

K2tog: Knit next two stitches together

M1: Make 1 stitch – With left hand needle, pick up bar from between the last worked stitch and next unworked stitch. Place Left hand needle in from front to back; knit that loop thru the back loop.

P: Purl

P2tog: Purl next two stitches together

RS: Right Side

Sl: Slip

SSK: Slip next two stitches individually from left needle to right needle; slip left needle into the front of the stitches; k2tog thru the back loop.

WS: Wrong Side

Turn: Stop where you are and flip work over (as if you’ve finished the row) and work the wrong side as told.
Thursday, July 22, 2010

Make Your Own Gees Bend Inspired Quilt -- Class and a History Lesson

Crafts are often more than crafts.  And the Gees Bend Quilt story is a piece of American History.  Did you know... "
  • Martin Luther King Jr. visited and spoke in Gee's Bend on the eve of the Selma march in 1965; later, mules from Gee's Bend pulled his casket.
  • Traditionally, quilts were hung on clotheslines to "air out" during the spring. Many quilters used this once-a-year public display as an opportunity to discover new ideas for their compositions.
  • Gee’s Benders have coined their own terms for common quilt patterns. They call the square-in-a-square Log Cabin pattern by the name "Housetop"; the Courthouse Steps variation is known locally as "Bricklayer." The Roman Stripes or Fence Rail pattern is, in Gee’s Bend, a "Crazy" quilt (no relation to the Crazy quilts made with irregular scraps).
  • In 1937 and '38, the federal government commissioned two series of photographs of Gee's Bend. The images have since become some of the most famous images of Depression-era American life.
  • In earlier years, one of the primary influences on the Gee's Bend quilt aesthetic was the newspaper- and magazine-collages used for insulation on the inside walls of homes in the rural American South.
 More from the Gee Bend Website....
Gee’s Bend is a small rural community nestled into a curve in the Alabama River southwest of Selma, Alabama. Founded in antebellum times, it was the site of cotton plantations, primarily the lands of Joseph Gee and his relative Mark Pettway, who bought the Gee estate in 1850. After the Civil War, the freed slaves took the name Pettway, became tenant farmers for the Pettway family, and founded an all-black community nearly isolated from the surrounding world. During the Great Depression, the federal government stepped in to purchase land and homes for the community, bringing strange renown — as an "Alabama Africa" — to this sleepy hamlet.
The town’s women developed a distinctive, bold, and sophisticated quilting style based on traditional American (and African American) quilts, but with a geometric simplicity reminiscent of Amish quilts and modern art. The women of Gee’s Bend passed their skills and aesthetic down through at least six generations to the present
Tonight starts Stitch DC's Gees Bend Inspired Quilt Class.  Be inspired by the stories of quilters who " transformed a necessity into a work of art — but their innovative and often minimalist approach to design is unique."  Come and by inspired to make your own "work of art".  Students should be have working knowledge of the sewing machine.  Materials are not included in the class but you get a 10% discount of all materials. 
SUMMER SESSION: 7/22,29 8/5 from 6-8:30 / $120 plus materials  register
FALL SESSION: October 9, 22 and November 6 / 1:30 to 3:00 pm / $120 plus materials / register online


PHOTOS thanks to GEE BEND WEBSITE and flickr Gee Bend pool

Wednesday, July 21, 2010

Mystery Craft A Long ...POST #2

How are you doing?  have you chosen a craft?  Are you a polycrafter? I'm thinking I'm going to merge my crochet and knit pieces but don't worry, I'll stick to the first plan for all of you!

Quilters:  finished cutting?  are you ready to sew?  the seam allowances (included in the cut pieces) are 1/4 inch.
Step 1:  Take your center square and sew a 2 1/2 x 3 1/2 inch rectangle to the left and right sides. 
Step 2:  Press the seams down.
Step 3: Sew the longer cut strips to the top and bottom of the rectangle you made in Step 1 above.
Step 4:  Press seams again.
Repeat steps 1-4 twenty-four (24) more times

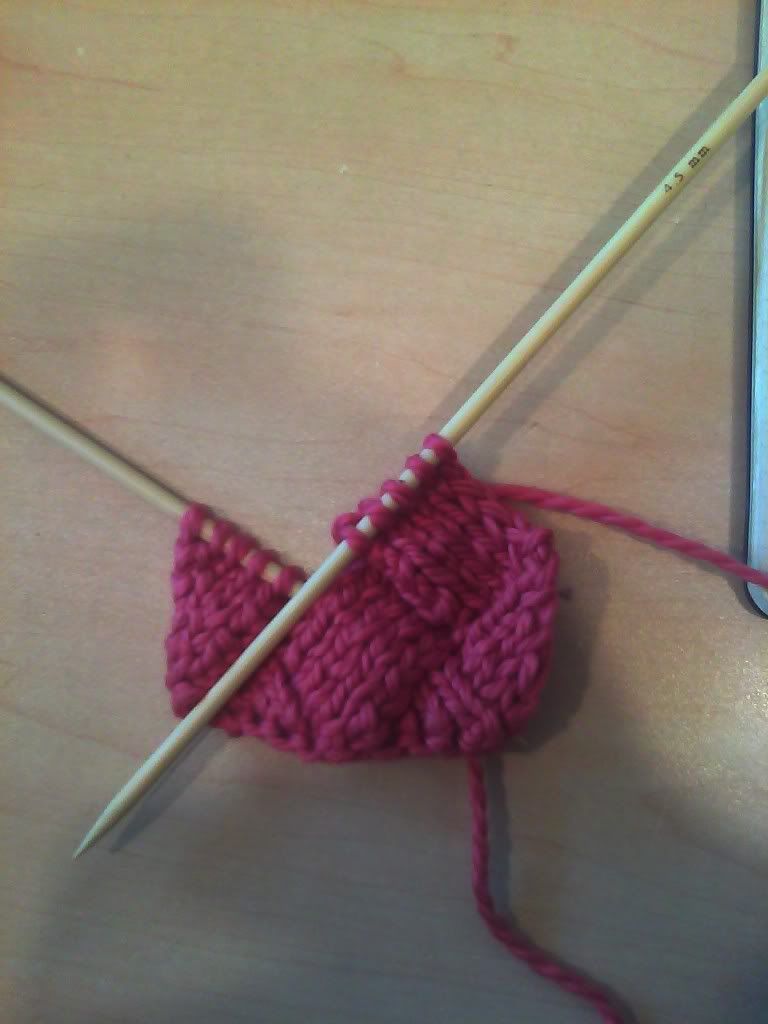
Knitters:  I got lots of calls wondering what the 7 1/2 inch square looked like at the end.  I also got requests to show how to pick up stitches. 

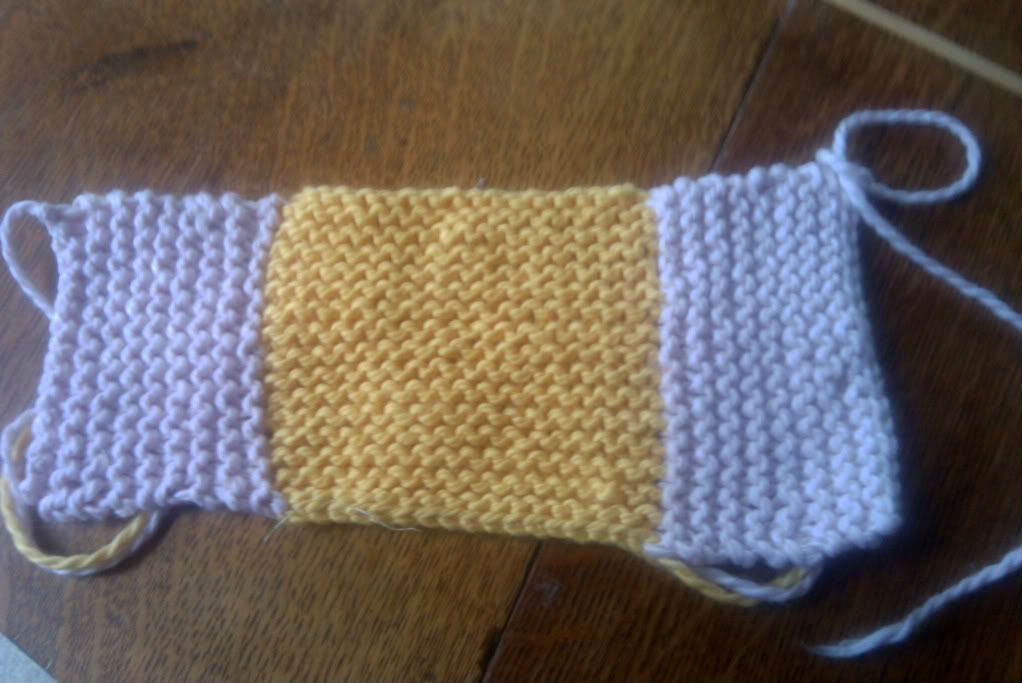
here is how the piece should look after you knit the center and pick up on the left and right selvedges.


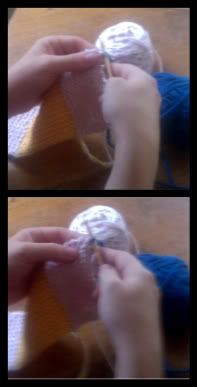
How to Pick Up Stitches:
1.  Looking at the right side of the rectangle.  Hold knitted rectangle in Left Hand and insert right hand needle into first stitch as if to knit. (photo1)
2.  Wrap yarn around right hand needle and pull up a new stitch. (photo 2)
3.  Insert right hand needle into second stitch on knitted piece in left hand.  (photo 3 below)
4.  Wrap yarn as if you are knitting (you are!) (photo 4) and pull up new stitches (photo 5)
5.  Two stitches picked up.  Continue picking up stitches across row.  To pick up evenly, place a marker at the half way mark and try to pick up half of the stitches up to that marker.

Knitters and crocheters, continue working on your squares and I'll post the next part of the puzzle on Friday. 

Friday, July 16, 2010

Mystery Quilt Along -- Choose your craft!

Wanna join Stitch DC as we do an online quilt along? 

here are the rules...
1.  You choose your craft -- knitting, crocheting, quilting
2.  Materials are available at the store.  Mention the quilt along and receive 10% off your purchase.  We can ship too! 
3.  Check in each friday and following wednesday for the next 6 weeks for each set of instructions. 
4.  Share your pieces via email to me.  I will post them as they come in.
5.  Enjoy, Create, Enjoy, Create, Enjoy!

Week one... scroll down... i have instructions for sewing, knitting and crocheting!

QUILTING:
Cut the the following:
1.  twenty five 3 1/2"  squares,
2.  fifty 2 1/2" by 3 1/2" rectangles
3.  fifty 2 1/2" by 7 1/2" rectangles

Knitting
Gauge= 4 stitches equal 1" in garter stitch
Start by cast on 12 stitches
Knit every row for 3" inches.  Cast off. 
Pick up and knit 12 stitches along the left selvedge side of the initial square (change colors if you want, have fun enjoy!).  Knit every row until piece measures 2 1/4" from cast on row.  Cast off.
Pick up and knit 12 stitches along the right selvedge side of the initial square (change colors if you want, have fun enjoy!). Knit every row until piece measures 2 1/4" from cast on row. Cast off.

Looking so the the peice measures 7 1/2 inches across the top and bottom.  Pick up and knit 30 stitches (again you change color if you want now) across the top and knit every row until current section measures 2 1/4" tall. cast off.
Now repeat and Pick up and knit 30 stitches (again you change color if you want now) across the bottom and knit every row until current section measures 2 1/4" tall. cast off.
You now have a 7 1/2" square.  Repeat the square pattern until you have 25 total

Crochet
Gauge: 4 single crochet equal 1"


Chain 13, turn and single crochet into the second from the hook, then single crochet (SC) across row (12 SC) turn.
Chain 2, make first single crochet into first stitch, then sc across row, turn.
repeat for 3" inches. fasten off.

Turn to left selvedge of the initial square (change colors if you want, have fun enjoy!). Work 12 SC down the selvedge row, turn,  Chain 2, make first single crochet into first stitch, then sc across row, turn.

Repeat previous row until current section measures 2 1/4" inches. fasten off.

Turn to right selvedge of the initial square, and single crochet 12 stitches down the selvedge edge. turn,
Row 2: Chain 2, make first single crochet into first stitch, then sc across row, turn.

Repeat previous row until current section measures 2 1/4" inches. fasten off.

Looking so the the piece measures 7 1/2 inches across the top and bottom. Single crochet 30 stitches (again you change color if you want now) across the top turn,
Row 2: Chain 2, make first single crochet into first stitch, then sc across row, turn.

Repeat previous row until current section measures 2 1/4" inches. fasten off.


Now repeat and Pick up Single crochet 30 stitches (again you change color if you want now) across the bottom and turn,
Row 2: Chain 2, make first single crochet into first stitch, then sc across row, turn.

Repeat previous row until current section measures 2 1/4" inches. fasten off.
 
You now have a 7 1/2" square. Repeat the square pattern until you have 25 total

Tuesday, July 6, 2010

More Sewing Classes -- From beginner to gee bend quilting!

SEWING CLASSES

Lotus Pillow-Beginner Sewing
Find a little bit of serenity in your sewing with this orginal design. It makes a wonderful place for your yarn stash, or if you have kids, a hidey hole for a stuffed animal collection. Or, stuff it with Fiberfill, and you have instant extra seating.
This class teaches basic machine sewing skills, as well as zipper installation.
July 16 / $55 plus materials / 6-8:30 pm  register

Tween Sewing- Beginner Sewing
Learn to sew on a machine and make a fashionable summer tote.
July 25 / $40 plus materials / 3-5 pm  -- register

Dress Class - Intermediate/Advanced Sewing
Using the book, Built by Wendy Dresses, you'll learn to sew a cotton shift designed specifically to your measuresments and then design your very own custom-fit frock!
7/22,29 8/3 / 6:30-8:30 / $125 plus materials  -- register

Journal Making
Learn to make a beautiful hand-bound journal with a sewing machine
July 24 / 12-2pm / $55 plus materials register

DIY Screenprinting
How to make your own designs into eco-friendly prints on fabric and paper!
12-3 / July 17 / $55 (bring a tee shirt to print) / register

Gees Bend Inspired Story Quilts-
Intermediate Sewing / An inspired story of quilters who " transformed a necessity into a work of art — but their innovative and often minimalist approach to design is unique."  Come and by inspired to make your own "work of art". 
7/22,29 8/5 from 6-8:30 / $120 plus materials  register

Upcycled T-shirt Bags with Applique
Using old fun tee shirts, make a fashionable tote that you can wear with pride at the market! 
This is a beginner sewing class so beginner welcome!  7/18 from 3-5
$40 (bring tee shirts for class)  register

Beginning Sewing -- Make your own lounge pants
Lounging pants for lazy days of knitting, crafting and napping.  Using Stitch DC's pretty cottons make your own pair of lounging yoga style pants
July 23 / 6:30-8:30 pm / $55 plus materials  register

Tuesday, June 22, 2010

Quilt Progress

So last week, I picked up one of our custom made Jelly Rolls and a charm packet and started to make a quilt for this upcoming class.  I cut the jelly rolls into 3.5" pieces and 8" pieces.  Then I started to sew. 

The individual quilt squares looked like this

I just kept making square and pressing them until I had 25.
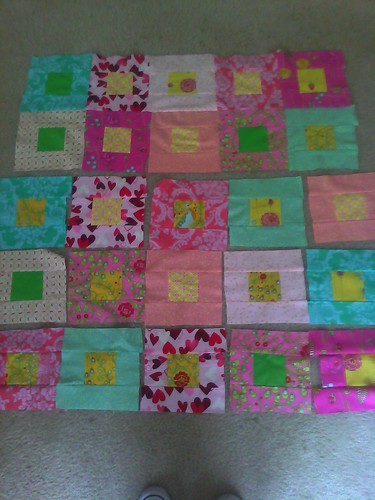
Next I arranged, and rearranged, and rearranged again the twenty five squares until I was pleased with the distribution and predetermined randomness of the quilt top.  Here is what it looks like now.
Quilt progress

Next step is sew the rows together.  If you are interested in learning more about how to make a jelly roll quilt or just find out what is a quilting jelly roll (hint... nothing to do with a bakery).  Sign up for the class.  And the best is I have tons of fabric left over to make matching shams or a small (crazy quilted) garment for Oonagh. 

Monday, May 31, 2010

Summer Picnic Napkins -- Free Pattern


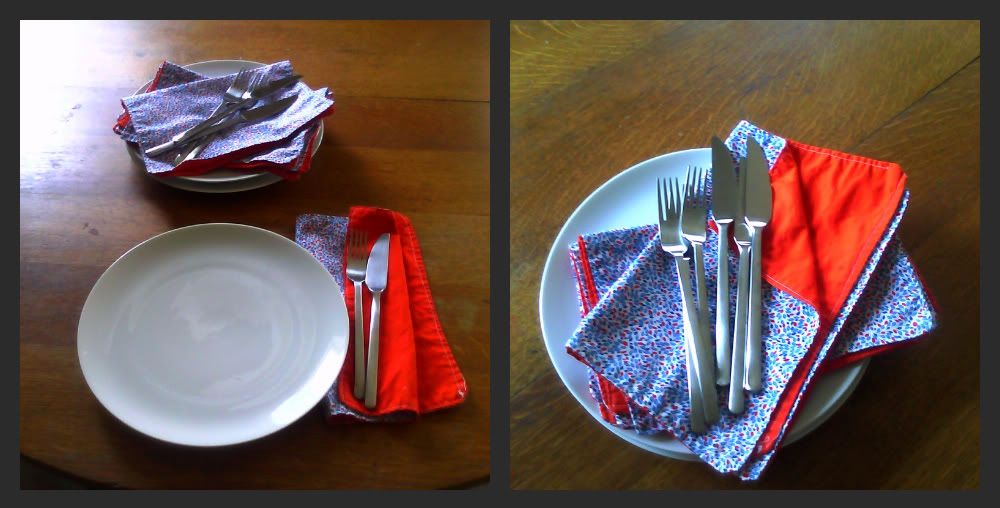
Alan's birthday was last week and on Sunday we had a family picnic.  Alan is allergic to bees so we can't eat outside so we did the picnic inside and then went out to play games with all the kids.  Nora's Portland cousins are in town for the week.  So Nora wanted to make some special items for the picnic.  We decided to make cloth napkins.  I let Nora pick out the colors and she even seamed most of the napkins herself. 

I'd like to share this easy project.  Instead of using tons of paper napkins, why not make a few easy cloth napkins that can be thrown in the wash and used over and over again. 
oneprettything
Materials to make 8 napkins.
* 4 fat quarters of two matching cottons.  (Nora picked out Kona Orange and All American Girl Leaves)  * thread
* rotary cutters
* measuring tape.

Nora and I made these from start to finish in about 2 hours yesterday.  So you still have time before tonight's barbeque to make a few pretty napkins!

1. Cut each fat quarter into four equal pieces -- 11 by 18 each
2.  Matching two different patterns, sew right sides together on three sides and leave a 3 inch hole in fourth side.  All seam allowances are 1/4 inch.
3.  Trim triangles off the corners and turn inside out. 
4.  Press flat and with a contrasting color thread sew a 1/4 seam around all four sides.

That's it!  Enjoy!

Tuesday, March 9, 2010

Knitting, Crochet, Sewing & Quilting Classes at Stitch DC

CLASSES AT STITCH DC

To Learn about new classes, just visit us at Stitch DC . Looking for another class or new technique let me know or sign up for an independent study class!

BELOW IS A QUICK SAMPLING OF OUR CLASS LIST.  THE BEST AND MOST UP-TO-DATE CALENDAR IS HERE

Beginner Classes
Knitting
This is where we start. Also a great refresher course. Three sessions total. Learn to knit, purl, stockinette stitch, seed stitch, cast on, bind off. $80/plus materials.
Too many to list... GO TO THE CLASS CALENDAR....  If you are groupon certificate holder, just sign up and fill in your groupon number when asked.  Thanks!


Learn to Knit With Stitch DC....


QUICK LEARN TO KNIT: Schedule can't fit in three session. Try this class. It's Stitch DC signature crash course. Learn to Knit FAST: $35 dollars plus materials. You'll learn the knit stitch and be on your way to making a Scarf!

Learn to Crochet FAST: 1 hour class from $15 dollars plus materials. You'll learn the a simple granny square and be on your way to making a Blanket! DATES TO BE ADDED

LEARN TO SEW:
Learn to Sew:  using Stitch DC's newest pattern, Spring Sewn Blanket. Oonagh is loving her blanket at right!  This is a perfect quick intro to sewing with a machine. We have machines that you can use during class or bring your own. $55 includes materials.  We have tons of sessions.  Pick one class and get start sewing!
DATES TO BE ANNOUNCED 


LEARN TO QUILT:
Each workshop consists of three 1.5 hour classes over 6 weeks. There is homework. We provide sewing machines at the store and you can use the store machines up to another 2 extra hours weekly during business hours (by appointment) to complete any extra homework.
These are beginner quilting class.
Class fee: $90 per workshop plus materials. All materials are available at Stitch DC and you receive a 10% discount off all materials used in the class.
Teacher: Marie
Dates and Classes to be added for January, February and March


Already Know How to Sew, Knit or Crochet... here are some more classes to inspire and educate...

Knit Mittens:
Mittens, just easy mittens. Any size flip top or not. Learn how to knit in the round, make a thumb and decrease for the top. Using bigger yarn, this mitten can be finished in the 2 hour class!


Knit a Sweater:
I've chosen three different patterns. One Easy for first time sweater knitters, one intermediate and one challenging. This class is designed for anyone who knows how to knit and purl. The rest is what we go over in class!
March Sessions:
Men's Sweater -- Tuesdays
Cables  -- Saturdays

LACE WORKSHOPS:
Learn to Knit Lace Quick (and make a wam scarf):


Learn to Knit a simple lace leaf motif in this crash course. If you know how to knit and purl, this class is for you. All you need is about 120 yards of Superchunky yarn and big needles (all available at the store with a 10% class discount!) and you'll be half way thru the scarf by the end of class.


CABLE WORKSHOPS:
 
Learn to Knit Cables in this crash course using one of Stitch DC most popular scarf projects. If you know how to knit and purl, this class is for you.   The scarf is one long cable anchored with big pompoms.  All you need is about 120 yards of Superchunky yarn and size 15/17 needles (all available at the store with a 10% class discount!) and you'll be half way thru the scarf by the end of class


LEARN TO KNIT SOCKS
Learn to Knit socks from the toe up and short row heels. You can chooe from double points, two circulars or magic loop.

We'll be going slowly and talking about each step, so feel free to register even if you've never worked in the round before. If you can knit and purl, this class is for you!
Three 1 hour sessions:

Monday, February 22, 2010

Spring Sewn Blankets

Oonagh and Cole needs light blankets for nap time at daycare.  Sometimes I send my knitted blankets but with weekly washing and carting them back and forth, I decided I needed to make something a bit lighter and easier to care for.  So when we received new fleece at the store I knew what I had to make.  I took 1 yard each of a soft cotton and soft fleece and made a light, soft nap blanket.  This would be a great first sewing project.  You can make it in 2 hours with a sewing machine or take your time to perfect your hand stitches.

Here are the instructions for machine sewing:

Materials (all available at Stitch DC):
1 yard soft fleece
1 yard cotton
coordinating cotton thread

Cut 1 yard each of your two fabrics.  Trim selvedges off and square off to 36" x 40" squares. 

With right sides facing together, sew three sides with a 1/4" seam allowance.  On fourth side, sew leaving 5" opening in the center of the seam.  Remember to backstitch at beginning and end of all seams.

Pull blanket inside out thru 5" hole.  Now with right sides facing, machine or hand sew 5" opening closed. 

Now for some fun, if your machine has fancy stitches, you can run a winding stitch along all four sides.  I did this 1" from edges.  Or you could hand stitch long stitches approximately 1" in from all edges. 

Enjoy!